Sunday, August 26, 2012

Georgia Pacific Tough Rock drywall, and Sheetrock Ultra Light review

Overall, I would give these products about the same rating, about a b+ because I really don't know the major differences among drywall manufacturers, quality of product, etc..., Tough Rock's particular drywall happened to be at Lowes, which home improvement store I frequently shop at.  Compared to Home Depot's Sheetrock ultra light brand, I couldn't tell a major difference between the two, except for Home Depot's Sheetrock ultra light brand did seem a little bit lighter than Georgia Pacific's Tough Rock.  Side by side after installation, if you can tell me which is which in this picture, I would pay out money to see someone tell me what the differences based on appearance and quality JUST by looking at the picture.  I'm willing to bet that there isn't much difference, even if someone came from either manufacturer and looked at my bathroom.  I would love to be educated on these differences if there are some.  Thanks for looking!


www.homedepot.com
www.lowes.com
www.acehardware.com
How to cut and hang drywall

 
Cutting drywall is actually the easier part of the whole entire drywall process, but getting the outlet, switch, or light holes cut just right can be challenging.  With circular cuts, the best way to measure to the center of the hole, then measure approximately 1/8" beyond the opening, to allow some wiggle room while you are hanging the drywall.  With square holes, measure the square openings, mark out the drywall and cut the openings with a drywall knife.  As you can see here, my original markings were obviously off, but I got it right the 2nd time :o).  So, as you are cutting and hanging drywall, I've found the best method is to hang the ceiling first, then the bottom pieces, then you can but the top drywall pieces into the corners.  You will have to watch as you are putting the corner pieces together, because they will not always fit right in.  So, have your razor knife ready to trim where the pieces start hitting so that they will fit together properly.  In the bottom left picture, you are looking at a can light over my bathroom.  In the top right picture, that is the the shower head.  The reason why the drywall is green, is because it is a moisture resistant drywall, specifically meant for walls around bathroom, tubs, or showers.  Regular drywall will eventually mold or deteriorate quicker due to water exposure from said tub or shower.  As you can tell, corners don't always line up perfectly, so thank goodness for the mudding and taping process.  Thanks for looking!

Roughed in drywall with roughed in plumbing for vanity

Saturday, August 25, 2012

How to use a jackhammer (Hilti TE 905-AVR)

You have to try this jackhammer if you are ever going to use one!  A convenient 120v power, this Hilti TE 905-AVR powers through cement and I was through my project in 2 hours.  In this project, I am finishing my bathroom, and have to move the tub drain.  It was a breeze compared to other jackhammer projects I've had to do.  AVR stands for anti vibration reduction which reduces the shaking effect, and you can definately tell compared to other jackhammers.  As I've used other jackhammers before, this Hilti was definately the smoothest.  You can rent the hilti TE 905-AVR at Home Depot, or purchase it at any approved Hilti retailers, (Home Depot, Industrial Supply).  Don't worry about me trying to get the model right in the video but, the video shows a small clip of what can be done.  The picture shows  how much concrete I had to break up so we can move the tub drain over to allow the drain for the tub to be installed.  I'll have to dig out down to expose the lateral section of drain pipe, then we can move the drain pipe over, install the p-trap and set the tub!  Whew, it has been a project, but if you have the right tools, aka Hilti TE 905-AVR, it makes everything so much easier.  Thank you Hilti!
Check out www.hilti.com to see other fine tools Hilti offers

Friday, August 24, 2012

Dangers of Radon

In trying to raise awareness about Radon and it's potential harm to others, I thought it was best just to post this link to this blog about Radon so friends, family, and neighbors know what to do.  Thanks for checking this out!

http://www.radovent.com/Radon-Gas-Blog/bid/74994/

Wednesday, August 22, 2012

How to change a filter

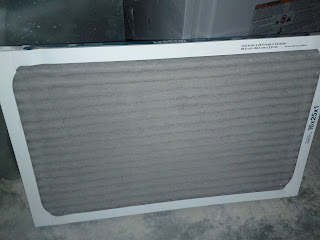
 If your Honeywell, 3M, Filtrete, Trane, or Lennox filters look like these two filters, it's time for a change!  These are common filters, but and they need to be changed every two months.  The recommended intervals is no longer than 90 days, but if you can get in the 60 day habit of changing your Honeywell, 3M, Filtrete, Trane, or Lennox filter you will be better off.  Sometimes the filter access is in the duct, sometimes the filter access is in the furnace. 


Either way, the arrow should be pointing towards the furnace.  If it is sloped to one side, slope the filter towards the furnace, with the top end being closest, and the bottom end being the furthest away.  Take care!  Check out www.honeywell.com to look at their filters!